【SpringMVC】RESTFul简介以及案例实现
RESTful
概念
REST:Representational State Transfer,表现层资源状态转移。
资源
资源是一种看待服务器的方式,即,将服务器看作是由很多离散的资源组成。每个资源是服务器上一个可命名的抽象概念。因为资源是一个抽象的概念,所以它不仅仅能代表服务器文件系统中的一个文件、数据库中的一张表等等具体的东西,可以将资源设计的要多抽象有多抽象,只要想象力允许而且客户端应用开发者能够理解。与面向对象设计类似,资源是以名词为核心来组织的,首先关注的是名词。一个资源可以由一个或多个URI来标识。URI既是资源的名称,也是资源在Web上的地址。对某个资源感兴趣的客户端应用,可以通过资源的URI与其进行交互。
*
资源的表述
资源的表述是一段对于资源在某个特定时刻的状态的描述。可以在客户端-服务器端之间转移(交换)。资源的表述可以有多种格式,例如HTML/XML/JSON/纯文本/图片/视频/音频等等。资源的表述格式可以通过协商机制来确定。请求-响应方向的表述通常使用不同的格式。
*
状态转移
状态转移说的是:在客户端和服务器端之间转移(transfer)代表资源状态的表述。通过转移和操作资源的表述,来间接实现操作资源的目的。
RESTFul的实现
具体说,就是 HTTP 协议里面,四个表示操作方式的动词:GET、POST、PUT、DELETE。
它们分别对应四种基本操作:GET 用来获取资源,POST 用来新建资源,PUT 用来更新资源,DELETE 用来删除资源。
REST 风格提倡 URL 地址使用统一的风格设计,从前到后各个单词使用斜杠分开,不使用问号键值对方式携带请求参数,而是将要发送给服务器的数据作为 URL 地址的一部分,以保证整体风格的一致性。
| 操作 | 传统方式 | REST风格 |
|---|---|---|
| 查询操作 | getUserById?id=1 | user/1-->get请求方式 |
| 保存操作 | saveUser | user-->post请求方式 |
| 删除操作 | deleteUser?id=1 | user/1-->delete请求方式 |
| 更新操作 | updateUser | user-->put请求方式 |
如何处理PUT和DELETE请求
由于浏览器只支持发送get和post方式的请求,那么该如何发送put和delete请求呢?
SpringMVC 提供了 HiddenHttpMethodFilter 帮助我们将 POST 请求转换为 DELETE 或 PUT 请求
HiddenHttpMethodFilter源码
public class HiddenHttpMethodFilter extends OncePerRequestFilter {
    private static final List<String> ALLOWED_METHODS;
    public static final String DEFAULT_METHOD_PARAM = "_method";
    private String methodParam = "_method";

    public HiddenHttpMethodFilter() {
    }

    public void setMethodParam(String methodParam) {
        Assert.hasText(methodParam, "'methodParam' must not be empty");
        this.methodParam = methodParam;
    }

    protected void doFilterInternal(HttpServletRequest request, HttpServletResponse response, FilterChain filterChain) throws ServletException, IOException {
        HttpServletRequest requestToUse = request;
        if ("POST".equals(request.getMethod()) && request.getAttribute("javax.servlet.error.exception") == null) {
            String paramValue = request.getParameter(this.methodParam);
            if (StringUtils.hasLength(paramValue)) {
                String method = paramValue.toUpperCase(Locale.ENGLISH);
                if (ALLOWED_METHODS.contains(method)) {
                    requestToUse = new HiddenHttpMethodFilter.HttpMethodRequestWrapper(request, method);
                }
            }
        }

        filterChain.doFilter((ServletRequest)requestToUse, response);
    }

    static {
        ALLOWED_METHODS = Collections.unmodifiableList(Arrays.asList(HttpMethod.PUT.name(), HttpMethod.DELETE.name(), HttpMethod.PATCH.name()));
    }

    private static class HttpMethodRequestWrapper extends HttpServletRequestWrapper {
        private final String method;

        public HttpMethodRequestWrapper(HttpServletRequest request, String method) {
            super(request);
            this.method = method;
        }

        public String getMethod() {
            return this.method;
        }
    }
}
源码解析
private static final List<String> ALLOWED_METHODS;

static {
        ALLOWED_METHODS = Collections.unmodifiableList(Arrays.asList(HttpMethod.PUT.name(), HttpMethod.DELETE.name(), HttpMethod.PATCH.name()));
    }
ALLOWED_METHODS是一个静态常量类型的字符串List,使用静态代码块在类加载时对其进行初始化,存储的内容为[PUT,DELETE,PATCH]。HttpMethod是一个枚举类型。
public static final String DEFAULT_METHOD_PARAM = "_method";
private String methodParam = "_method";
HiddenHttpMethodFilter类的静态常量“默认方法参数”是"_method",给定私有方法参数也是"_method"。
public void setMethodParam(String methodParam) {
        Assert.hasText(methodParam, "'methodParam' must not be empty");
        this.methodParam = methodParam;
    }
提供了一个方法用于修改类内默认的方法参数并且断言形参不能为空。
protected void doFilterInternal(HttpServletRequest request, HttpServletResponse response, FilterChain filterChain) throws ServletException, IOException {
        HttpServletRequest requestToUse = request;
        if ("POST".equals(request.getMethod()) && request.getAttribute("javax.servlet.error.exception") == null) {
            String paramValue = request.getParameter(this.methodParam);
            if (StringUtils.hasLength(paramValue)) {
                String method = paramValue.toUpperCase(Locale.ENGLISH);
                if (ALLOWED_METHODS.contains(method)) {
                    requestToUse = new HiddenHttpMethodFilter.HttpMethodRequestWrapper(request, method);
                }
            }
        }

        filterChain.doFilter((ServletRequest)requestToUse, response);
    }
这个方法是该类中实现过滤器功能的主要方法,是重点。第一个if判断要求请求的方式必须是POST否则方法不会执行。paramValue获取请求参数this.methodParam的值,这里需要注意当前请求必须传输请求参数_method。将paramValue统一为大写字母之后,判断如果ALLOWED_METHODS包含paramValue的请求方式,就把该请求方式和request作为参数创建HttpMethodRequestWrapper静态内部类,并把返回值赋给requestToUse,过滤器放行的时候原本的request已经被替换成了requestToUse这一新的,以paramValue为请求方式的请求。
下面看一下HttpMethodRequestWrapper静态内部类
private static class HttpMethodRequestWrapper extends HttpServletRequestWrapper {
        private final String method;

        public HttpMethodRequestWrapper(HttpServletRequest request, String method) {
            super(request);
            this.method = method;
        }

        public String getMethod() {
            return this.method;
        }
    }
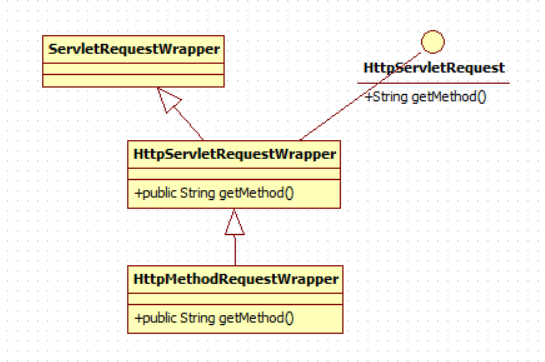
HttpMethodRequestWrapper类的继承关系如下:

HttpMethodRequestWrapper类重写了getMethod()方法,偷梁换柱,实现了对请求方式的修改,可以使getMethod()方法返回PUT或DELETE。
由于HttpMethodRequestWrapper实现了HttpServletRequest接口,所以利用多态,可以在上面讲的doFilterInternal方法中,使得父类引用HttpServletRequest指向该类,在放行时把原来的request替换,也就实现了,服务器发送PUT和DELETE的需求。
使用方法
<form action="/rest/12" method="post">
    <input type="hidden" name="_method" value="DELETE">
    <input type="submit" value="delete">
  </form>
  <form action="/rest/12" method="post">
    <input type="hidden" name="_method" value="PUT">
    <input type="submit" value="put">
  </form>
  <form action="/rest/12" method="post">
    <input type="submit" value="post">
  </form>
  <form action="/rest/12" method="get">
    <input type="submit" value="get">
  </form>
控制器
@RequestMapping(value = "/rest/{id}",method = RequestMethod.DELETE)
    public String testrestDELETE(@PathVariable int id, Model model){
        model.addAttribute("msg","delete请求"+id);
        return "SUCCESS";
    }
    @RequestMapping(value = "/rest/{id}",method = RequestMethod.PUT)
    public String testrestPUT(@PathVariable int id,Model model){
        model.addAttribute("msg","put请求"+id);
        return "SUCCESS";
    }
    @RequestMapping(value = "/rest/{id}",method = RequestMethod.POST)
    public String testrestPOST(@PathVariable int id,Model model){
        model.addAttribute("msg","post请求"+id);
        return "SUCCESS";

    }
    @RequestMapping(value = "/rest/{id}",method = RequestMethod.GET)
    public String testrestDELETE(@PathVariable int id, ModelMap modelMap){
        modelMap.addAttribute("msg","get请求"+id);
        return "SUCCESS";
    }
RESTFul案例
案例需求
传统 CRUD 小项目,实现对员工信息的增删改查。

add:添加员工
delete:删除员工
update:更新员工
项目结构
├─springMVC-demo04
│  ├─src
│  │  ├─main
│  │  │  ├─java
│  │  │  │  └─com
│  │  │  │      └─springmvc
│  │  │  │          └─gonghr
│  │  │  │              ├─bean
│  │  │  │              ├─controller
│  │  │  │              └─dao
│  │  │  ├─resources
│  │  │  └─webapp
│  │  │      ├─static
│  │  │      │  └─js
│  │  │      └─WEB-INF
│  │  │          └─templates
│  │  └─test
│  │      └─java
│  └─target
│      ├─classes
│      ├─generated-sources
│      ├─maven-archiver
│      ├─maven-status
│      └─springMVC-demo04-1.0-SNAPSHOT
└─src
SpringMVC 框架搭建
准备工作
准备实体类
/bean/Employee.java
public class Employee {

    private Integer id;
    private String lastName;

    private String email;
    //1 male, 0 female
    private Integer gender;

    public Integer getId() {
        return id;
    }

    public void setId(Integer id) {
        this.id = id;
    }

    public String getLastName() {
        return lastName;
    }

    public void setLastName(String lastName) {
        this.lastName = lastName;
    }

    public String getEmail() {
        return email;
    }

    public void setEmail(String email) {
        this.email = email;
    }

    public Integer getGender() {
        return gender;
    }

    public void setGender(Integer gender) {
        this.gender = gender;
    }

    public Employee(Integer id, String lastName, String email, Integer gender) {
        super();
        this.id = id;
        this.lastName = lastName;
        this.email = email;
        this.gender = gender;
    }

    public Employee() {
    }
}
准备dao模拟数据
/dao/EmployeeDao
@Repository
public class EmployeeDao {

   private static Map<Integer, Employee> employees = null;

   static{
      employees = new HashMap<Integer, Employee>();

      employees.put(1001, new Employee(1001, "E-AA", "aa@163.com", 1));
      employees.put(1002, new Employee(1002, "E-BB", "bb@163.com", 1));
      employees.put(1003, new Employee(1003, "E-CC", "cc@163.com", 0));
      employees.put(1004, new Employee(1004, "E-DD", "dd@163.com", 0));
      employees.put(1005, new Employee(1005, "E-EE", "ee@163.com", 1));
   }

   private static Integer initId = 1006;

   public void save(Employee employee){
      if(employee.getId() == null){
         employee.setId(initId++);
      }
      employees.put(employee.getId(), employee);
   }

   public Collection<Employee> getAll(){
      return employees.values();
   }

   public Employee get(Integer id){
      return employees.get(id);
   }

   public void delete(Integer id){
      employees.remove(id);
   }
}
功能清单
| 功能 | URL 地址 | 请求方式 |
|---|---|---|
| 访问首页√ | / | GET |
| 查询全部数据√ | /employee | GET |
| 删除√ | /employee/2 | DELETE |
| 跳转到添加数据页面√ | /toAdd | GET |
| 执行保存√ | /employee | POST |
| 跳转到更新数据页面√ | /employee/2 | GET |
| 执行更新√ | /employee | PUT |
具体功能
访问首页
/templates/index.html
<!DOCTYPE html>
<html lang="en" xmlns:th="http://www.thymeleaf.org">
<head>
    <meta charset="UTF-8" >
    <title>Title</title>
</head>
<body>
<h1>首页</h1>
<a th:href="@{/employee}">访问员工信息</a>
</body>
</html>
xml配置首页的前端控制器
springMVC.xml
<!--开启mvc注解驱动-->
    <mvc:annotation-driven></mvc:annotation-driven>
    <mvc:view-controller path="/" view-name="index"></mvc:view-controller>
查询所有员工数据
控制器
@RequestMapping(value = "/employee", method = RequestMethod.GET)
public String getEmployeeList(Model model){
    Collection<Employee> employeeList = employeeDao.getAll();
    model.addAttribute("employeeList", employeeList);
    return "employee_list";
}
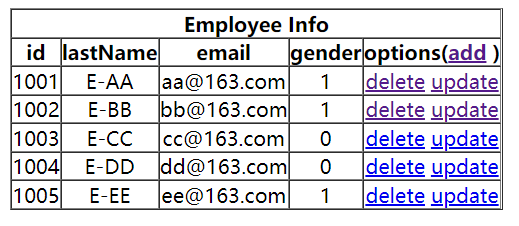
employee_list.html
<!DOCTYPE html>
<html lang="en" xmlns:th="http://www.thymeleaf.org">
<head>
    <meta charset="UTF-8">
    <title>Employee Info</title>
    <script type="text/javascript" th:src="@{/static/js/vue.js}"></script>
</head>
<body>

    <table border="1" cellpadding="0" cellspacing="0" style="text-align: center;" id="dataTable">
        <tr>
            <th colspan="5">Employee Info</th>
        </tr>
        <tr>
            <th>id</th>
            <th>lastName</th>
            <th>email</th>
            <th>gender</th>
            <th>options(<a th:href="@{/toAdd}">add</a>)</th>
        </tr>
        <tr th:each="employee : ${employeeList}">
            <td th:text="${employee.id}"></td>
            <td th:text="${employee.lastName}"></td>
            <td th:text="${employee.email}"></td>
            <td th:text="${employee.gender}"></td>
            <td>
                <a class="deleteA" @click="deleteEmployee" th:href="@{'/employee/'+${employee.id}}">delete</a>
                <a th:href="@{'/employee/'+${employee.id}}">update</a>
            </td>
        </tr>
    </table>
</body>
</html>
注意利用Thymeleaf视图编写超链接时如果要在超链接中拼接request域中的数据,要在@{}内部利用+${}进行拼接,否则大括号和字符串都会被解析。
正确写法:
<a th:href="@{'/employee/'+${employee.id}}">update</a>浏览器解析结果:
http://localhost:8080/springMVC_demo04/employee/1001
如果写成:
<a th:href="@{/employee/${employee.id}}">update</a>那么浏览器地址栏会显示解析结果:http://localhost:8080/springMVC_demo04/employee/${employee.id}
删除功能
- 创建处理delete请求方式的表单
<!-- 作用:通过超链接控制表单的提交,将post请求转换为delete请求 -->
<form id="delete_form" method="post">
    <!-- HiddenHttpMethodFilter要求:必须传输_method请求参数,并且值为最终的请求方式 -->
    <input type="hidden" name="_method" value="delete"/>
</form>- 删除超链接绑定点击事件
引入vue.js
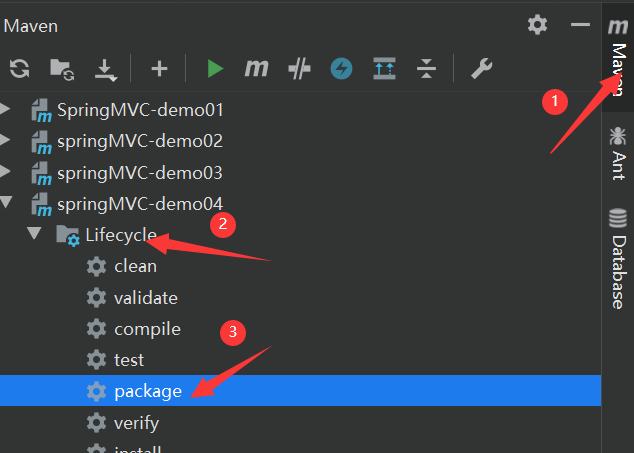
<script type="text/javascript" th:src="@{/static/js/vue.js}"></script>注意:这里引入vue.js后浏览器是无法检索到的,因为该文件是后期加入的一个静态文件,而项目的war包早就打好,没有加入vue.js,所以需要重新打包项目。maven-->LifeCycle-->package

配置默认servlet处理器
springMVC.xml
<!--    开放对静态资源的访问-->
<!--    静态资源先被springMVC前端控制器处理,如果找不到相应的请求映射,就交给默认的servlet处理-->
    <mvc:default-servlet-handler></mvc:default-servlet-handler>
删除超链接
<a class="deleteA" @click="deleteEmployee" th:href="@{'/employee/'+${employee.id}}">delete</a>通过vue处理点击事件
<script type="text/javascript">
    var vue = new Vue({
        el:"#dataTable",
        methods:{
            //event表示当前事件
            deleteEmployee:function (event) {
                //通过id获取表单标签
                var delete_form = document.getElementById("delete_form");
                //将触发事件的超链接的href属性为表单的action属性赋值
                delete_form.action = event.target.href;
                //提交表单
                delete_form.submit();
                //阻止超链接的默认跳转行为
                event.preventDefault();
            }
        }
    });
</script>- 控制器方法
@RequestMapping(value = "/employee/{id}", method = RequestMethod.DELETE)
public String deleteEmployee(@PathVariable("id") Integer id){
    employeeDao.delete(id);
    return "redirect:/employee";  //请求重定向
}
跳转到添加数据页面
- 配置view-controller
<mvc:view-controller path="/toAdd" view-name="employee_add"></mvc:view-controller>- 创建employee_add.html
<!DOCTYPE html>
<html lang="en" xmlns:th="http://www.thymeleaf.org">
<head>
    <meta charset="UTF-8">
    <title>Add Employee</title>
</head>
<body>

<form th:action="@{/employee}" method="post">
    lastName:<input type="text" name="lastName"><br>
    email:<input type="text" name="email"><br>
    gender:<input type="radio" name="gender" value="1">male
    <input type="radio" name="gender" value="0">female<br>
    <input type="submit" value="add"><br>
</form>

</body>
</html>
执行保存
- 控制器方法
@RequestMapping(value = "/employee", method = RequestMethod.POST)
public String addEmployee(Employee employee){
    employeeDao.save(employee);
    return "redirect:/employee";
}
跳转到更新数据页面
- 修改超链接
<a th:href="@{'/employee/'+${employee.id}}">update</a>- 控制器方法
@RequestMapping(value = "/employee/{id}", method = RequestMethod.GET)
public String getEmployeeById(@PathVariable("id") Integer id, Model model){
    Employee employee = employeeDao.get(id);
    model.addAttribute("employee", employee);
    return "employee_update";
}- 创建employee_update.html
<!DOCTYPE html>
<html lang="en" xmlns:th="http://www.thymeleaf.org">
<head>
    <meta charset="UTF-8">
    <title>Update Employee</title>
</head>
<body>

<form th:action="@{/employee}" method="post">
    <input type="hidden" name="_method" value="put">
    <input type="hidden" name="id" th:value="${employee.id}">  <!-- 注意隐藏数据id -- >
    lastName:<input type="text" name="lastName" th:value="${employee.lastName}"><br>
    email:<input type="text" name="email" th:value="${employee.email}"><br>
    <!--
        th:field="${employee.gender}"可用于单选框或复选框的回显
        若单选框的value和employee.gender的值一致,则添加checked="checked"属性
    -->
    gender:<input type="radio" name="gender" value="1" th:field="${employee.gender}">male
    <input type="radio" name="gender" value="0" th:field="${employee.gender}">female<br>
    <input type="submit" value="update"><br>
</form>

</body>
</html>
执行更新
- 控制器方法
@RequestMapping(value = "/employee", method = RequestMethod.PUT)
public String updateEmployee(Employee employee){
    employeeDao.save(employee);
    return "redirect:/employee";
}
处理静态资源的过程
在上面案例中的引入vue.js静态文件过程中有几个零碎的步骤,下面讲解一下原因。
在javaweb项目中,静态资源是被默认servlet处理的。
进入到Tomcat的配置文件目录中E:\DevTols\apache-tomcat-9.0.30\conf,打开web.xml。
强调一点:Tomcat中的web.xml作用于部署到Tomcat的所有工程,而工程中的web.xml只针对于当前工程,如果当前工程中的web.xml与Tomcat中的web.xml发生冲突,则以当前工程中的web.xml为准。
<servlet>
        <servlet-name>default</servlet-name>
        <servlet-class>org.apache.catalina.servlets.DefaultServlet</servlet-class>
        <init-param>
            <param-name>debug</param-name>
            <param-value>0</param-value>
        </init-param>
        <init-param>
            <param-name>listings</param-name>
            <param-value>false</param-value>
        </init-param>
        <load-on-startup>1</load-on-startup>
    </servlet>

    <servlet-mapping>
        <servlet-name>default</servlet-name>
        <url-pattern>/</url-pattern>
    </servlet-mapping>
这是Tomcat中默认的servlet,观察其请求路径
<servlet>
        <servlet-name>springMVC</servlet-name>
        <servlet-class>org.springframework.web.servlet.DispatcherServlet</servlet-class>
        <init-param>
            <param-name>contextConfigLocation</param-name>
            <param-value>classpath:springMVC.xml</param-value>
        </init-param>
        <load-on-startup>1</load-on-startup>
    </servlet>
    <servlet-mapping>
        <servlet-name>springMVC</servlet-name>
        <url-pattern>/</url-pattern>
    </servlet-mapping>
则以当前项目中的servlet为准,所有请求都用DispatcharServler处理,而DispatcharServler的处理方式是在控制器中寻找相应的请求映射,而控制器中没有访问静态资源的请求映射,所以无法找到静态资源,报404错误。
解决方案就是在springMVC.xml中开放对静态资源的访问
<!--    开放对静态资源的访问-->
<!--    静态资源先被springMVC前端控制器处理,如果找不到相应的请求映射,就交给默认的servlet处理-->
    <mvc:default-servlet-handler></mvc:default-servlet-handler>
注意:开放对静态资源的访问和开放mvc注解驱动必须同时进行。如果只开放对静态资源的访问,则所有请求都由默认servlet处理;如果只开放mvc注解驱动,则所有请求都由DispatcharServlet处理。
如果都开放,则先用DispatcharServlet处理,如果没有找到请求映射,则由默认servlet处理。
<!--开启mvc注解驱动-->
    <mvc:annotation-driven></mvc:annotation-driven>
<!--    开放对静态资源的访问-->
<!--    静态资源先被springMVC前端控制器处理,如果找不到相应的请求映射,就交给默认的servlet处理-->
    <mvc:default-servlet-handler></mvc:default-servlet-handler>